Category: Story
淘宝2347735657740863694(SUPER-INGENUITY.CN) The 48 Best-Selling Products:
FACTORS AFFECTING THE SERVICE LIFE OF GEOTEXTILES: DURABILITY AND MAINTENANCE
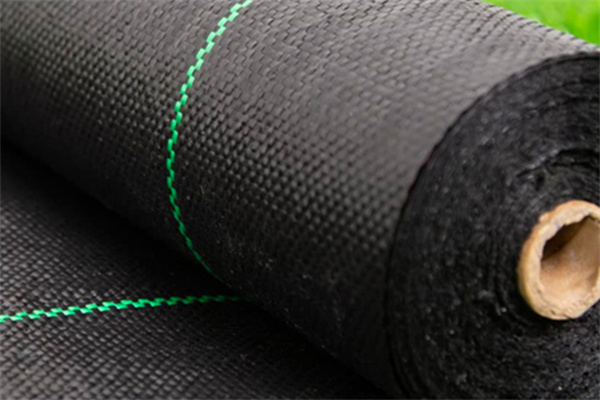
Factors Affecting the Service Life of Geotextiles: Durability and Maintenance

Geotextiles are widely used in civil engineering and construction projects for their ability to enhance soil stability, improve drainage, and provide erosion control. They play a crucial role in applications such as road construction, foundation stabilization, and landscaping. However, the service life of geotextiles is influenced by several factors, including material composition, environmental conditions, and maintenance practices. Understanding these factors is essential for maximizing the longevity and performance of geotextiles in various applications.

1. Material Composition and Quality
The durability of geotextiles begins with the material they are made from. Geotextiles are typically produced from synthetic materials such as polypropylene, polyester, or polyethylene. Each of these materials has different properties, such as resistance to UV radiation, chemicals, and temperature fluctuations, which directly affect their lifespan.
Polypropylene is commonly used for its resistance to chemical degradation and ability to perform well in high-strength applications.
Polyester geotextiles are favored for their strength and resistance to UV radiation, making them suitable for applications exposed to sunlight.
Polyethylene, while less common, is highly resistant to abrasion and is often used for applications involving extreme conditions.
When purchasing geotextiles, it’s important to consider the specific requirements of the project and choose materials that will withstand the environmental conditions to which they will be exposed. For those looking for affordable solutions, it’s possible to buy geotextile from reputable sources that offer good quality products at competitive prices.
2. Exposure to Environmental Conditions
Environmental factors play a significant role in the degradation of geotextiles. The primary factors that affect the service life of geotextiles include:
UV Radiation:
Prolonged exposure to ultraviolet (UV) rays can break down the chemical structure of geotextiles, particularly those made from polypropylene and polyethylene. UV degradation can lead to the weakening of fibers and eventual failure of the geotextile. To mitigate this, manufacturers often add UV stabilizers to their products, but over time, these additives may lose effectiveness.
Temperature Fluctuations:
Geotextiles that experience extreme temperature changes, such as those in hot climates or areas with harsh winters, are more likely to suffer from physical wear and tear. High temperatures can cause the materials to become brittle, while freezing temperatures can make them more prone to cracking.
Chemical Exposure:
Geotextiles used in soil stabilization or drainage systems may come into contact with various chemicals, such as fertilizers, pesticides, or industrial effluents. The composition of the geotextile determines its resistance to chemical degradation. Polyester-based geotextiles are generally more resistant to chemicals than polypropylene ones, making them a better choice for chemically aggressive environments.
Mechanical Stress:
Geotextiles are subject to mechanical stress, especially in road construction and other high-load applications. Over time, repeated loading and unloading can cause the fibers in the geotextile to break down. Proper installation and maintenance can help alleviate some of the stress on the material, but eventually, wear and tear will take its toll.
In regions with extreme conditions, it’s important to select a geotextile that has been specifically designed to withstand the local environment. For instance, if you’re working in a location with high UV radiation, it might be best to purchase geotextiles that are treated with UV inhibitors to increase their lifespan.
3. Proper Installation Practices
The service life of geotextiles is also highly dependent on proper installation techniques. Incorrect installation can result in premature failure of the geotextile, regardless of the quality of the material. Common installation issues include:
Overstretching:
When geotextiles are overstretched during installation, they may lose their strength and fail prematurely. It’s essential to install the material without over-tensioning it to ensure optimal performance.
Improper Overlap:
Geotextiles are often used in layered systems, where sections of the material are overlapped to ensure continuous coverage. If the overlap is insufficient or improperly aligned, the geotextile may fail under load.
Poor Anchoring:
Geotextiles must be properly anchored to prevent movement or displacement over time. Improper anchoring can result in the material shifting out of place, causing it to lose its effectiveness in providing stability or filtration.
Hiring a professional with expertise in geotextile installation can help prevent these issues and ensure that the material performs as expected over its service life.
4. Regular Maintenance and Inspections
Regular maintenance and inspections are vital for extending the lifespan of geotextiles, especially in projects where the material is exposed to harsh conditions. Some key maintenance practices include:
Cleaning:
Geotextiles used in drainage applications can become clogged with debris, silt, or sediment. This can reduce their filtration efficiency and lead to the failure of the entire system. Regular cleaning of geotextiles, especially those used in erosion control or drainage systems, is essential to maintain performance.
Repairs:
If geotextiles become damaged due to mechanical stress, punctures, or environmental factors, they should be promptly repaired or replaced. Small holes or tears in the material can compromise its integrity and lead to larger issues down the line.
Monitoring:
Regular monitoring of geotextiles in use can help detect signs of wear early, allowing for timely intervention before the material fails completely. Signs to watch for include visible degradation, stretching, or shifting of the material.
For those looking to replace worn-out geotextiles or add more to their existing systems, finding a cheap geotextile manufacturer who offers reliable and durable products can make a significant difference in reducing overall project costs.
5. Conclusion
The service life of geotextiles is influenced by various factors, including material composition, exposure to environmental conditions, installation practices, and ongoing maintenance. By understanding these factors and selecting the right geotextile for your specific needs, you can ensure that the material performs effectively for as long as possible.
To get started on your next project, consider sourcing high-quality materials from trusted suppliers. If you’re looking for an affordable option, you can buy geotextile from reputable manufacturers who offer a balance of cost and quality. For bulk orders or long-term projects, it’s also worth reaching out to a cheap geotextile manufacturer who can provide cost-effective solutions without compromising on material performance. By taking these steps, you’ll be well on your way to ensuring the durability and longevity of your geotextile installations.
LET AN ELECTRIC TRICYCLE BECOME YOUR RELIABLE COMPANION IN DAILY LIFE
Let an Electric Tricycle Become Your Reliable Companion in Daily Life
In today’s fast-paced world, finding reliable and efficient transportation options is more important than ever. Whether you’re commuting to work, running errands, or looking for a sustainable solution for short-distance travel, an electric tricycle could be the answer to your transportation challenges. With their unique combination of practicality, speed, and environmental benefits, electric trikes are fast becoming a popular choice for those seeking a smarter, more efficient way to get around.
Unlike traditional bicycles or cars, 3 wheel electric bikes offer the perfect balance between comfort, stability, and convenience. In this blog, we’ll delve into how an electric trike can become an invaluable part of your daily routine, providing both functional and enjoyable transportation solutions. Let’s explore the reasons why the best three wheel electric bike could be the perfect companion to elevate your daily commuting experience.
A Practical and Efficient Mode of Transportation
One of the key advantages of an electric trike is its ability to offer a more efficient and sustainable mode of transportation. In crowded cities, where traffic congestion is a common problem, it can be incredibly frustrating to rely on a traditional car. Electric trikes, on the other hand, are compact and nimble, able to navigate through narrow streets and tight spaces with ease. They allow you to bypass traffic jams and avoid the hassle of finding parking, making them an ideal choice for short-distance trips within urban areas.
For those who live in cities with heavy traffic or limited parking spaces, a 3 wheel electric bike can significantly improve your daily commute. Instead of wasting valuable time stuck in traffic or circling around looking for a parking spot, you can enjoy a quick and efficient journey, cutting down on stress and frustration. This increased efficiency can also save you time and money, making your daily routine far more streamlined.
Stability and Comfort for Every Ride
Another reason why an electric tricycle stands out is its superior stability and comfort compared to two-wheeled vehicles. While traditional bicycles can be challenging for some to balance, particularly when carrying heavy loads or navigating through traffic, a 3 wheel electric bike offers a more secure and stable ride. The three-wheel design ensures that riders can maintain balance without worrying about tipping over, even in less-than-ideal road conditions.
Moreover, electric trikes are designed for comfort. Many models feature padded seats, footrests, and ergonomic handlebars, making them comfortable for longer rides. This added comfort ensures that your trips, whether short or long, are enjoyable rather than tiring. For people with mobility challenges or those who are not accustomed to traditional biking, the stability and ease of use of a 3 wheel electric bike can make commuting or running errands a breeze.
Eco-Friendly Transportation Solution
As environmental concerns continue to grow, many people are looking for sustainable alternatives to gasoline-powered vehicles. Electric trikes offer a clean, green transportation solution. Powered by electricity rather than fossil fuels, these vehicles produce zero emissions, making them an excellent choice for those looking to reduce their carbon footprint.
Using a 3 wheel electric bike instead of a car for short trips can contribute to reducing air pollution and minimizing the environmental impact of your daily travels. This makes electric tricycles a great option for environmentally-conscious individuals who are seeking ways to make their transportation choices more sustainable. By choosing an electric trike, you’re helping to create a cleaner, healthier environment for yourself and future generations.
The Best Three Wheel Electric Bike for Your Needs
When it comes to selecting the best three wheel electric bike, there are a few important factors to consider. Depending on your needs, different models offer varying features. For example, if you need to transport goods or groceries, some electric trikes come with spacious cargo areas to make transporting items a hassle-free experience. For others who might be looking for a vehicle for personal transportation, comfort and speed are key considerations.
The best three wheel electric bike will typically offer a balance between power, comfort, and ease of use. Look for a model with a reliable battery that provides a good range on a single charge, as well as a motor strong enough to help you easily navigate hills or longer distances. Many models also come with adjustable seating, allowing for a more customized and comfortable riding experience.
A Cost-Effective and Low-Maintenance Option
In addition to the practical benefits, electric trikes are also cost-effective and easy to maintain. Compared to cars, electric trikes require far less maintenance. With fewer moving parts and no need for oil changes or expensive repairs, the upkeep costs are minimal. In fact, the cost of running an electric trike is significantly lower than a traditional car, as it only requires electricity to charge its battery. This makes electric trikes a great choice for those looking to reduce transportation costs over time.
In terms of upfront costs, electric trikes can also be more affordable than purchasing and maintaining a car. With the rise of electric vehicles and advancements in battery technology, the prices of electric tricycles have become more accessible to a wider range of consumers. While the initial investment may be higher than a traditional bicycle, the long-term savings and convenience more than make up for it.
Ideal for Personal Use and Business Needs
While electric trikes are often seen as an ideal solution for personal commuting, they also offer significant benefits for businesses. For example, many small businesses rely on 3 wheel electric bikes for deliveries, particularly in urban areas. With their ample cargo space and ability to navigate through traffic, these electric tricycles are perfect for last-mile delivery solutions. They help businesses save on fuel costs, reduce their carbon footprint, and improve delivery efficiency.
The versatility of electric trikes extends beyond personal use and business applications. They are also an excellent choice for recreational activities. Whether you’re cycling around the park or going on a leisurely ride through the countryside, the comfort and stability of a 3 wheel electric bike ensure that you can enjoy the experience to the fullest.
Conclusion: A Smarter, Greener Future
An electric tricycle is more than just a mode of transportation; it’s a lifestyle change that can make your daily life easier, more enjoyable, and more sustainable. Whether you’re looking to cut down on commute time, reduce your environmental impact, or simply enjoy the comfort and stability of a three-wheeled vehicle, a 3 wheel electric bike can help you achieve your goals.
With the growing popularity of electric trikes, it’s clear that they are becoming an essential tool for modern-day mobility. So, why not make the smart choice and let an electric tricycle become your trusted companion in daily life? From reducing traffic stress to contributing to a cleaner planet, the benefits are clear, and the future is electric.
USING A CHLORINE FLOATER CAN EFFECTIVELY PREVENT ALGAE GROWTH IN YOUR POOL
Using a Chlorine Floater Can Effectively Prevent Algae Growth in Your Pool
Maintaining a clean, safe, and inviting pool requires consistent care and attention, especially when it comes to controlling algae growth. Algae can quickly turn your clear, refreshing pool into a green, slimy mess, making it unsafe and unappealing for swimmers. Fortunately, there is a simple and effective solution to keep algae at bay: using a chlorine floater nearby.
Chlorine plays a crucial role in keeping pool water free from harmful bacteria and algae. However, manually adding chlorine can sometimes lead to imbalances in the water, and it may not provide consistent coverage throughout the pool. This is where a best chlorine floater for pool comes in. These floating devices are designed to release chlorine steadily over time, ensuring that your pool’s chlorine levels remain optimal and that algae growth is effectively prevented. Let’s dive deeper into how a pool chlorine tablet floater works and why it’s a must-have for algae-free pool maintenance.
The Problem of Algae in Pools
Algae thrive in warm, stagnant water, and pools are the perfect environment for them if not properly treated. Algae can spread quickly, especially in areas where chlorine levels are low, and can be difficult to eliminate once established. There are various types of algae, including green, black, and mustard algae, each of which presents its own challenges when it comes to removal.
Green algae are the most common type, and they can turn the water a murky green, making the pool look uninviting. Black algae, on the other hand, are harder to treat because they grow in clumps and can adhere to pool surfaces, requiring more intensive cleaning methods. Mustard algae can create yellowish stains on pool walls and is known for its resistance to chlorine. All types of algae can be difficult to manage, especially if chlorine is not consistently distributed throughout the pool.
The Role of Chlorine in Pool Maintenance
Chlorine is an essential pool chemical that works by killing bacteria, viruses, and algae, ensuring the water remains safe and clean for swimming. When added in the correct amount, chlorine prevents algae from growing by disrupting the algae’s cellular structure, effectively killing it before it has a chance to spread.
Typically, pool owners add chlorine manually, either by pouring liquid chlorine into the pool or using chlorine tablets. However, the issue with manual dosing is that it can be hard to maintain consistent chlorine levels across the entire pool, and sometimes chlorine dissipates too quickly, leaving certain areas vulnerable to algae growth.
This is where a chlorine floater nearby comes into play. A best chlorine floater for pool ensures that chlorine is steadily and evenly distributed throughout the water, preventing algae from taking hold. The floater works by slowly dissolving chlorine tablets over time, maintaining a consistent level of chlorine throughout the pool without the need for frequent adjustments.
How the Pool Chlorine Tablet Floater Works
A pool chlorine tablet floater is a simple but highly effective tool for pool owners. It is a floating device that holds chlorine tablets and allows them to dissolve gradually as the floater moves around the pool. The slow release of chlorine helps to keep the water sanitized consistently, reducing the chance for algae growth and maintaining the pool’s overall cleanliness.
The best chlorine floater for pool models come with adjustable settings, allowing you to control the rate at which chlorine is released. By adjusting the release rate, you can ensure that your pool has the right amount of chlorine, even in areas with high sun exposure where chlorine tends to dissipate more quickly. This controlled release mechanism is essential for ensuring the chlorine levels stay balanced, which is crucial for effective algae prevention.
What makes the chlorine floater nearby particularly beneficial is its ease of use. Once you load the floater with chlorine tablets and set it in the pool, it does all the work. You don’t need to worry about manually adding chlorine every few days or trying to maintain the perfect balance in the water. The floater provides peace of mind by ensuring a constant supply of chlorine, protecting your pool from algae growth and keeping it ready for use at all times.
Preventing Algae Growth with Consistent Chlorine Levels
The key to preventing algae growth is consistency. When chlorine levels fluctuate, algae have a better chance of surviving and multiplying. By using a chlorine floater nearby, you can ensure that your pool is constantly treated with the appropriate amount of chlorine. This helps to eliminate the conditions that allow algae to grow and thrive.
Regular use of a pool chlorine tablet floater also helps prevent other pool problems, such as cloudiness and foul odors, which can occur when chlorine levels are too low. By maintaining optimal chlorine levels with a floater, your pool remains inviting, clear, and safe for swimming, without the need for harsh chemicals or time-consuming cleaning.
Additional Benefits of Using a Chlorine Floater
In addition to preventing algae growth, a best chlorine floater for pool offers several other advantages for pool owners. First, it reduces the amount of time and effort needed for pool maintenance. Instead of manually adding chlorine every few days, the floater allows you to set it and forget it. This saves time, reduces labor, and ensures that your pool remains properly disinfected with minimal effort.
Second, using a chlorine floater nearby is a cost-effective way to maintain your pool. Since the floater releases chlorine gradually, you’re less likely to waste chlorine, and you can make each tablet last longer. This makes it an affordable and efficient option for maintaining your pool’s water quality, especially during the peak swimming season when regular pool maintenance is most important.
Finally, a chlorine floater can help you avoid over-chlorinating the pool, which can lead to irritation for swimmers and damage to pool equipment. By releasing chlorine slowly and steadily, the pool chlorine tablet floater helps maintain a balanced and safe chlorine level, keeping your pool in top condition while protecting your investment in pool equipment.
Conclusion: A Simple Solution for Algae-Free Pools
Using a chlorine floater nearby is one of the easiest and most effective ways to prevent algae growth in your pool. By maintaining consistent chlorine levels, the best chlorine floater for pool ensures that your pool water stays clean, clear, and free from harmful microorganisms. The pool chlorine tablet floater is a low-maintenance, cost-effective, and reliable solution for pool owners who want to enjoy their pools without the constant worry of algae growth.
If you’re tired of dealing with algae outbreaks and the hassle of manual chlorine dosing, consider investing in a chlorine floater. It’s a small change that can make a big difference in the quality and cleanliness of your pool, allowing you to spend more time enjoying the water and less time maintaining it.
WINDPROOF DESIGN: HOW BUTANE CIGAR LIGHTERS PERFORM IN OUTDOOR ENVIRONMENTS
Windproof Design: How Butane Cigar Lighters Perform in Outdoor Environments
When it comes to enjoying a cigar outdoors, a butane cigar lighter is an essential companion. These lighters, designed for precision and reliability, have gained popularity for their ability to perform flawlessly even in windy conditions. Whether you’re on a breezy patio, at a campsite, or on a boat, the right lighter ensures you can enjoy your cigar without frustration. Let’s explore why the windproof design of a butane cigar lighter is a game-changer and how it makes outdoor use a breeze.

What Makes Butane Cigar Lighters Unique?
A butane cigar lighter is specifically engineered to provide a consistent flame in varying conditions. Unlike regular lighters, which may falter in wind or extreme weather, these lighters use pressurized butane fuel and an efficient ignition system to produce a strong, wind-resistant flame. Key features that make them stand out include:
1. Jet Torch Flame: Butane cigar lighters often use a jet torch flame, which is more intense and focused than a standard flame. This ensures a quick and even light, critical for premium cigars.
2. Adjustable Flame: Many models allow you to adjust the flame size, offering greater control for different cigar types.
3. Windproof Mechanism: A windproof design prevents the flame from being extinguished, even in gusty conditions.
These qualities make butane cigar lighters the go-to choice for cigar enthusiasts who love the outdoors.
Why Windproof Design Matters for Outdoor Use
Lighting a cigar outdoors can be challenging without the right lighter. Traditional flame lighters struggle against even the slightest breeze, leading to uneven burns or frustration. A windproof butane cigar lighter solves this problem by delivering a steady flame regardless of the environment.
Key Outdoor Scenarios Where Windproof Design Shines
1. Camping Trips: Imagine lighting up after a long hike in the mountains. With a butane cigar lighter, windy conditions are no obstacle.
2. Boating and Fishing: Water-based activities are often accompanied by strong winds. The windproof feature ensures you can enjoy your cigar without interruption.
3. Golf Courses: Long stretches of open space mean exposure to wind. A reliable butane cigar lighter keeps your cigar lit during a round of golf.
4. Backyard Gatherings: Even in your backyard, breezy evenings can make lighting a cigar tricky. A windproof lighter handles the job seamlessly.
Features to Look for in a Butane Cigar Lighter for Outdoor Use
When selecting a butane cigar lighter, pay attention to these features to ensure it meets your outdoor needs:
1. Durability: Outdoor use demands a lighter that can withstand drops, scratches, and exposure to the elements.
2. Ease of Refueling: A good lighter should be easy to refill with butane, allowing you to keep it functional for extended use.
3. Multi-Jet Flames: Some models feature multiple jet flames, which enhance the windproof capability and provide faster ignition.
4. Compact Design: Portability is key for outdoor activities. Look for a lighter that fits easily in your pocket or cigar case.
By choosing the right lighter, you’ll enjoy the full outdoor cigar experience without hassle.
Why Buy from a Trusted Butane Cigar Lighter Wholesaler
Purchasing from a reputable butane cigar lighter wholesaler ensures you get a product that meets high standards of quality and performance. Wholesalers often offer a wider selection of lighters, catering to different preferences and budgets. Additionally, they can provide bulk purchasing options, which is especially useful for cigar lounges, retailers, or event organizers.
Benefits of Buying from a Wholesaler
1.Cost Savings: Wholesale prices are often significantly lower than retail.
2.Wide Variety: Wholesalers stock an extensive range of models, from single-jet to multi-jet designs.
3.Reliable Quality: A trusted wholesaler ensures you receive authentic, high-performance lighters.
If you’re sourcing lighters for business or personal use, partnering with a reliable butane cigar lighter wholesaler guarantees you get the best value.
Finding Butane Cigar Lighters for Sale
Whether you’re an outdoor enthusiast or a cigar aficionado, it’s easy to find butane cigar lighters for sale both online and in specialty stores. Look for retailers that offer competitive pricing and a selection of high-quality brands. Many stores also provide reviews and ratings, helping you choose a lighter that fits your needs.
Tips for Finding the Best Deals
1. Compare Options: Look for sales or discounts on popular models.
2. Check Reviews: Ensure the lighter you choose is highly rated for windproof performance.
3. Consider Warranty: A warranty reflects the manufacturer’s confidence in their product’s durability.
When you shop for butane cigar lighters for sale, prioritize quality over price to ensure you invest in a reliable tool.
Caring for Your Butane Cigar Lighter
To keep your lighter performing at its best, follow these maintenance tips:
1. Refill Properly: Use high-quality butane fuel to prevent clogging or damage.
2. Adjust Flame Settings: Keep the flame setting moderate to extend the lighter’s lifespan.
3. Clean Regularly: Remove debris or dust from the nozzle and ignition area to ensure smooth operation.
4. Store Safely: Keep the lighter in a dry place, away from extreme temperatures or humidity.
Proper care ensures your lighter remains a dependable tool for years to come.
Conclusion
The windproof design of a butane cigar lighter makes it an essential tool for cigar enthusiasts who enjoy the outdoors. Its strong flame, durability, and ease of use ensure you can light your cigar effortlessly, even in challenging conditions. Whether you’re on a mountain trail, at sea, or hosting a backyard gathering, a windproof lighter enhances your experience.
THE CORE STRUCTURE OF THE PLATE CUTTING MACHINE: ANALYSIS FROM THE CUTTING HEAD TO THE CONTROL SYSTEM
The Core Structure of the Plate Cutting Machine: Analysis from the Cutting Head to the Control System
When it comes to manufacturing and metalworking, a plate cutting machine is an essential piece of equipment that defines precision, efficiency, and versatility. These machines have evolved significantly over the years, becoming indispensable tools in industries like automotive, construction, and aerospace. Understanding the core structure of a plate cutting machine—especially the components from the cutting head to the control system—can help you make informed decisions when choosing the right equipment for your business.
What Is a Plate Cutting Machine?
A plate cutting machine is a tool designed to cut various types of metal plates or sheets into desired shapes, sizes, and patterns. These machines use advanced technology, such as plasma, laser, or waterjet cutting systems, to deliver accurate and highspeed cutting solutions. Whether you’re handling mild steel, aluminum, stainless steel, or even complex alloys, a plate cutting machine offers unparalleled flexibility for your industrial needs.
What sets the best plate cutting machine apart is its ability to perform precision cutting without sacrificing speed or efficiency. To achieve this, the core structure of the machine must work seamlessly, and its components—from the cutting head to the control system—are critical for optimal performance.
The Cutting Head: The Powerhouse of Precision
At the heart of any plate cutting machine lies the cutting head. This component is where the actual cutting process occurs. Depending on the type of cutting machine, the cutting head may utilize plasma torches, laser beams, or highpressure water jets.
1. Plasma Cutting Heads:
These are ideal for cutting thick metal plates, offering a high level of precision and speed. The plasma arc melts the metal, and compressed gas blows the molten material away.
2. Laser Cutting Heads:
Laser cutting heads are perfect for tasks requiring extreme precision, such as cutting intricate patterns or working with thin metal sheets.
3. Waterjet Cutting Heads:
These heads use a highpressure jet of water mixed with abrasive particles to cut through almost any material. They are especially useful for applications where heatsensitive materials are involved.
Investing in the best plate cutting machine means ensuring the cutting head is compatible with your material types and operational requirements. A highquality cutting head will also reduce maintenance needs and downtime.
The Drive System: Smooth and Stable Operation
The drive system ensures the movement of the cutting head and plate, facilitating smooth and stable cutting operations. There are typically two main types of drive systems: gantry and cantilever.
1. Gantry Systems:
These are common in highprecision machines, offering dualsided support for stability.
2. Cantilever Systems:
More suited for smallerscale operations, these are lightweight and economical but may lack the rigidity of gantry systems.
Choosing a plate cutting machine with an advanced drive system is crucial for achieving straight and clean cuts. Look for features like servo motors or stepper motors for enhanced accuracy and control.
The Table: Supporting the Plate
The table of the plate cutting machine plays a key role in supporting the metal plate during the cutting process. Features to look for include:
1. Ventilation Systems:
To remove dust, smoke, or debris during cutting.
2. Durable Construction:
A robust table ensures minimal vibrations, leading to more precise cuts.
3. Integrated Water Beds:
These help cool the material and reduce warping, especially in plasma cutting machines.
The Control System: The Brain of the Machine
The control system is where technology truly shines in modern plate cutting machines. It governs the entire cutting process, from guiding the cutting head to managing complex design patterns.
1. CNC (Computer Numerical Control):
CNC systems are the gold standard for plate cutting machines. They enable the operator to program intricate cutting designs and adjust cutting parameters like speed, power, and angle.
2. UserFriendly Interfaces:
The best plate cutting machine will feature an intuitive user interface, allowing operators of all skill levels to perform advanced cutting operations.
3. Remote Monitoring:
Some advanced machines come with IoT capabilities, enabling realtime monitoring and diagnostics to prevent downtime.
A highquality control system not only enhances cutting accuracy but also improves overall productivity. For this reason, finding a reliable plate cutting machine supplier with expertise in advanced CNC systems is vital.
Conclusion
The core structure of a plate cutting machine—from its cutting head and drive system to its control system—determines its ultimate performance and reliability. By understanding these components and their roles, you can make informed decisions when selecting the best plate cutting machine for your business needs. Moreover, partnering with a trustworthy plate cutting machine supplier is critical for longterm success, ensuring you receive not only the machine but also the support and expertise to maximize its potential.
Whether you’re upgrading your existing equipment or entering the world of plate cutting for the first time, investing in the right machine and supplier will be the ultimate key to achieving superior cutting performance and operational efficiency.
Application areas of our bearings

We are proud of our P5 bearings are applied for leading transmission manufacturers in Germany, Italy, UK and America. Our bearings are mainly used in agriculture, mining, paper making, wood product, sugar processing industry, heavy equipment, motors, metal, oil and gas industry.
Do you need it?
https://bearingshow.net/shopIntroduct/56.html
Application field of our product

The company mainly involves the industries: automotive vehicles, tobacco machinery, machine tools, mechanical textiles, printing machines, general machinery, food and beverage industry, electronic automation machinery, and so on.
https://bearingshow.net/shopindex/Beijing-WeiChen-International-Import-Export-Trading-Co-Ltd/47.html
2011智能手机操作系统大盘点
今天就是2011年的跨年夜了,这一年互联网的变化非常多,其中智能手机市场的变化也非常大,手机操作系统的格局在可见的2012年也会和2011年有很大的不同。Android系统在下半年大放异彩,但是Symbian在2011年度仍然是市场份额最多的操作系统。领先安卓和苹果。
根据StatCounter’s figures 的统计数据,塞班在年终仍然超过年初的份额,IOS系统有所下降,但是Android取得的成就令人瞩目。
·Symbian2011年是2011年智能手机操作系统的TOP1。一月份的市场份额是30.25%,十二月份是33.59%。这一成绩在安卓的竞争下来之不易。
·Apple在智能手机市场赚得盆满钵满,但是IOS的市场占有率仍然从最初的25.02下降到22.56
·谷歌的安卓发展最为迅猛,从14.61%上升到21.74,2012年不出意外的情况下,超过苹果毫无悬念,能否打败Symbian,就看NOKIA能不能hold住了。
·最大的失败者无疑是黑莓,从15.03%跌至7.86.年初的时候他可是比安卓份额要高,不过安卓是一款开源系统,很多厂商都用,份额大也不奇怪。
2011第二季度,Symbian手机的大约售出2400万台。这一成绩很出色,但是在新的2012年,NOKIA的前途似乎不是那么明朗。
分类:新闻资讯
标签:2011, mobile os, os, 互联网, 排名, 操作系统, 智能手机, 盘点
Keyword: WMS